
Sometimes you want to measure the exact frequency of a call – perhaps you need to know what the maximum frequency a call reaches to help separate two confusion species. This can be done in Audacity by enabling a couple of settings. Normally if you click and drag your mouse across the spectrogram you simply select a time slice of the recording. Instead, if you first go to the Edit menu, Preferences and Spectrogram page, you can Enable Spectral Selection:

Now when you click and drag the mouse it creates a box around the call. You can resize and align the box by dragging the dashed and solid white lines to span the range of the call or whichever bits of the call you want to measure:

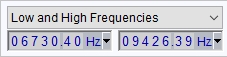
Finally, if its not already enabled, go to the View menu, Toolbars and tick Spectral Selection Toolbar. This will then show a small toolbar widget at the bottom of the screen that provides information about the selection you’ve made. By default it shows the centre and range of the selection but using the little dropdown arrow you can change this to show high and low frequency. For this particular call, the sound started at 6730 Hz and ranged up to a peak of 9426 Hz:
Note these screen grabs were made from Audacity v2.3.3 on Windows.
<– Back to Processing
