
Below are some basic steps for a simple configuration of an AudioMoth for nocmig recording. These steps were written (May 2021) for an AudioMoth running the latest firmware and using the Windows Configuration app version 1.4.1
First, ensure you have:
- a set of 3 AA batteries with plenty of charge,
- a micro SD card with plenty of space,
- a micro-USB data cable. Note that some USB cables are used for charging phones and won’t provide the necessary connection (this is usually evident when you plug in the AudioMoth and the date/time remains in grey even when you press Configure)
Using the App
Do not plug in the AudioMoth yet. Start the AudioMoth Configuration App. It has three main tabs. For this basic setup we will use just the first (Recording Settings) and second (Schedule) tabs. When you first open the app the date and time at the top will be in grey and will show 01/01/1970 – this is fine and will not change until much later in the setup process.
The App defaults to using UCT time, but you have the option (File > Local time) to toggle to use local time. This is helpful if you are in a different time zone or so that daylight saving times are shown.
To set up the AudioMoth you need to understand that it has two ways of setting when recordings are made. Firstly you can set what time of the day or night you want it to be active (‘Schedule’). Secondly you can determine the recording pattern between those times by setting how long each file will be, and how long the gap is between each file (‘Recording Settings’). For example, you can use the schedule to set the recorder to be active from 6pm to 6am, then the recording settings to have files that are 15 minutes long, with 5 minutes gap between each file (or any other permutation you like).
Recording Settings
You have a number of settings to select (if not listed below, I leave the others at default):
Sample Rate dictates the sound frequencies you can record, and the rule of thumb is the sample rate needs to be double the highest sound frequency you will need. For nocmig calls, which range up to 10 kHz, you need a sample rate of at least 20 kHz. I normally use 32 kHz. You can use a higher sample rate but this will just make bigger files (fill up your card quicker) and use more battery power. If you want to record bats, you will need a much higher sample rate.
Gain determines how loud the recordings are. For nocmig recordings I usually use High
Sleep duration is the length of time (in seconds) between each consecutive file. For nocmig recording we usually record continuously, but to give the AudioMoth a chance to save the data I usually set this to 5s.
Recording duration is the length of a file (in seconds). For continuous nocmig recording I usually set this to 1795s – i.e. 30 minutes less 5 seconds. In combination with the above sleep duration this will make one file every half hour

Schedule
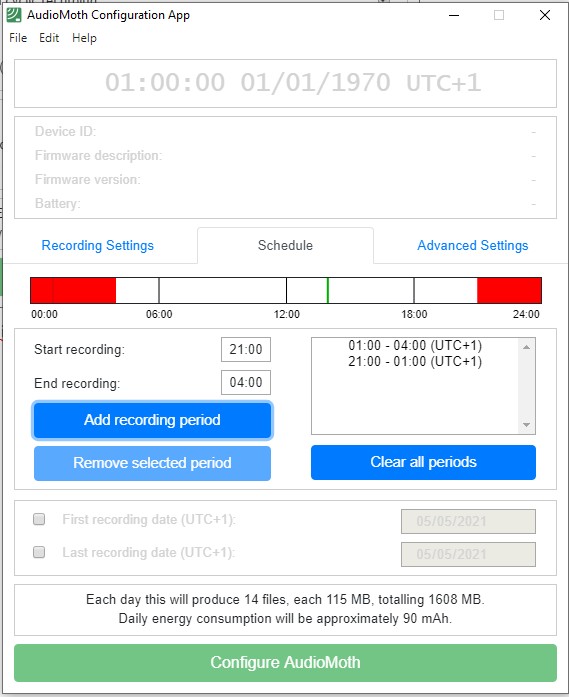
Here you can set the start and end times of recording. You can have multiple periods of recording (e.g. an hour at dusk and an hour at dawn) but for nocmig recordings you would usually just have a single period, for example, setting the start time at 21:00 and the end time at 04:00. After entering these times you must click the Add recording period button so that the times are listed in the box on the right. It is normal for your single period of recording to be split automatically either side of midnight as in the example below. Note also that now we have set the recording window the summary at the bottom of the app has updated to indicate that our particular schedule, file duration and sample rate will generate 14 files per day, each 115MB in size.
There are further settings such as delayed start and Advanced Settings including triggers, but they’re for another day.
Sync the AudioMoth
Finally now is the time to push these settings to the AudioMoth. Ensure your batteries and card are installed, and that the switch is set to USB. Using the USB cable, plug in the AudioMoth to the computer. At this point the time should change from grey to black and the seconds will start counting, but it will still show the wrong time. Only when you press the green Configure AudioMoth button will the time update to the correct time. Everything should now be set. You can unplug the AudioMoth, move the switch to Custom and it should start recording on your desired schedule.
