
Inspired by the introduction of “La migration nocturne par le son” from Wroza & Rochefort (Delachaux et Niestlé 2021), I wanted to build myself a cheap parabolic microphone. I was always a bit lazy to do so; especially melting Plexiglas in the oven to shape your own parabolic dish was not my favourite idea. But when I found out that a squirrel dish could be used to construct your own parabolic mic, I started as soon as I could. You need of course to be able to solder (or know someone who does it for you) the capsule microphones to a 3.5mm audio jack.
Here below, you find some ideas on the material needed to build your own parabolic microphone (feel free to improve it). There are two versions, with a single pair of capsules and with a dual pair of capsules.
Franck Hollander (franck.hollander@gmail.com)
A. Parabolic mic with 2×1 capsules
1. Parabolic dish
You find different “squirrel baffles” on the internet, most of them are 40 cm in diameter. That is a good size (the Dodotronic dish is over 50 cm, but it doesn’t amplify necessarily much more, see section D). A 40 cm dish is also easier to carry around. I bought the Audubon dish for 40 EUR (incl. delivery costs). Here is another good dish (50 EUR with delivery costs).
2. Capsule microphones
These very small microphones (used in the Dodotronic dishes) are extremely powerful, and probably the best option for NocMig recordings (not per se for the quality of the recording, but especially for its reach). The most powerful ones are the EM272 (sensitivity -28 dB, sold on micbooster.com), and even a bit more performant the Pui Audio AOM-5024 (sensitivity -24db, sold on mouser.com). I used the AOM-5024 model (you need to buy 20+ of them to avoid the high shipping costs).
To solder the EM272 capsules, a tutorial is found here.
To solder the AOM-5024 capsules, you can use this tutorial. See Figure 1 below for some of the different steps.

3. Audio jack
These very cheap audio jacks work well, and you can use them twice. If you want to buy other ones, think about buying some that are “double-wired” (each channel in a separate wire). On some modern 3.5mm audio jacks, you find both channels in one wire, and it sometimes brings problems (pers. comm.). Also, don’t forget you want stereo audio jack, so with two black bands on the plug (and not one, or three as for smartphones).
4. Solder material
If you don’t have solder material at home, you can buy for instance this one: it is cheap and works well. There is also a bit more expensive material, certainly worth if you want to solder more in the future (and not only for your parabolic microphone).
5. Handle and microphone holder
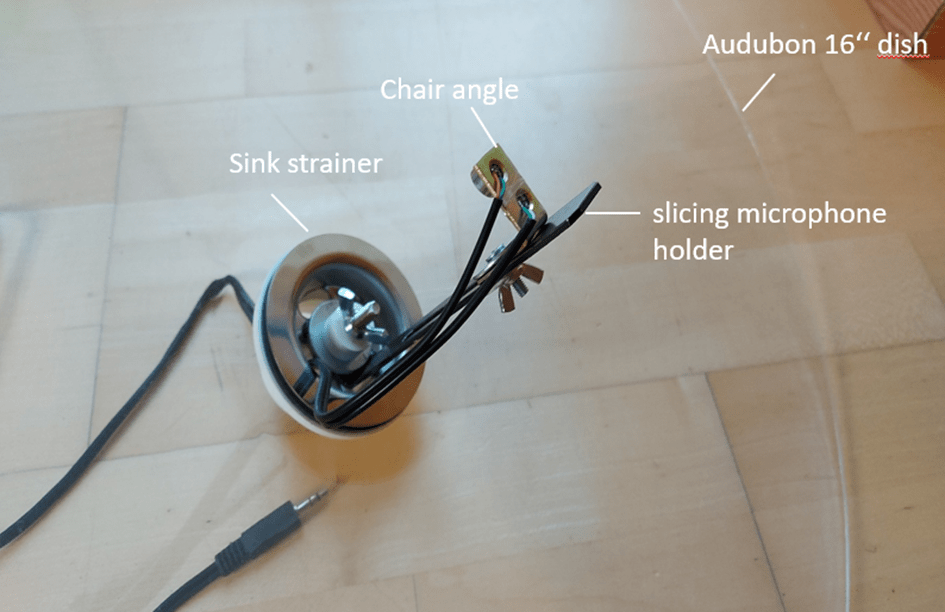
The Audubon dish has a central opening, where I fixed a 1 ½’’ sink strainer to it. It allows you to screw a 1 ½’’ siphon to it (straight or bended). I know, not all very glamorous material, but keep the low budget of this DIY dish in mind! 😉
I inverted the screw of the sink strainer (so that it goes inside the dish). I then screwed a “microphone holder” on it, which is a metal piece I found at home (it is probably originating from an IKEA furniture, very similar to this one). The interesting feature is that there is a vertical opening which allows to slice your microphones in or out of the parabolic dish. Having your capsules a bit outside the dish, increases the probability to capture migrating birds calling from the side. However, you also increase the number of local birds on your recordings. Having one set of microphones inside, and another set outside the dish might compromise this issue (see further).
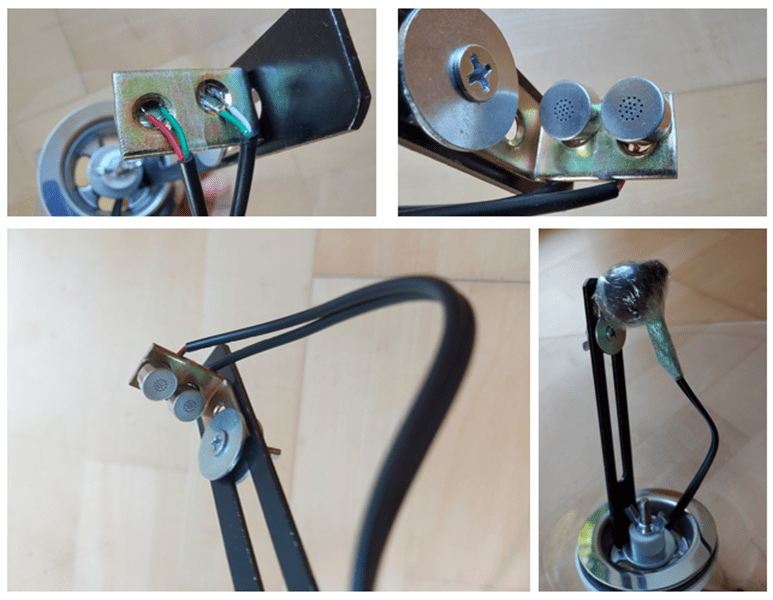
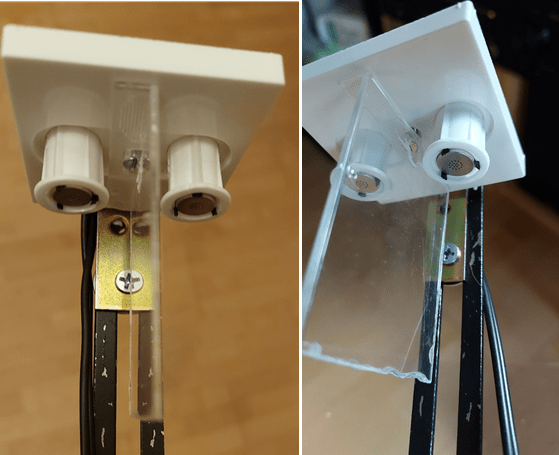
After soldering the capsules in the audio jack, I fixed these to this “chair angle”, that I then fixed on the “slicing” microphone holder (see Fig. 2). You can simply tape the wires and capsules to the chair angle. After that, do not forget to protect the capsules with a plastic cover (I simply use cling film, very thin and still waterproof).
6. Wind shield
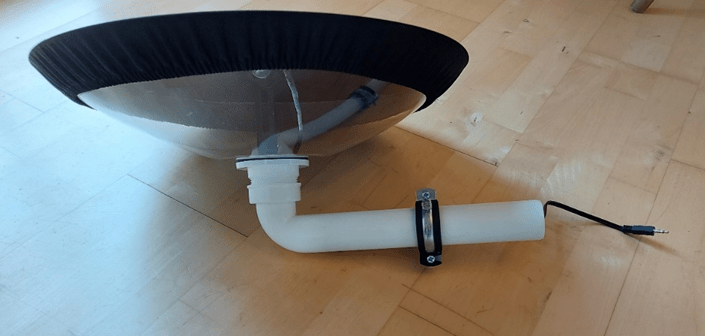
A wind shield is not only interesting for wind itself, but also to protect your microphones against water and humidity. I use a chair protection cover in polyester, and it works quite well. Even on a rainy night, the plastic film protecting the microphones were not even wet. What helps is to put a little “roof” (not too large of course) on top of the slicing microphone holder (any object you find), it again protects the microphones from rain, and is not giving such a sharp tension to the wind shield with the microphone holder. In addition to the wind shield, I also included some protecting foam close to the microphones, coated with some plastic cling film (see Figure 3).
The DIY dish is compact, easy to transport and not heavy, and looks in the end as in Figure 4.
B. Parabolic mic with 2×2 capsules
The parabolic dish with 2 capsules gives excellent results and is comparable to the Dodotronic (see section D). A possible upgrade is to have 2×2 capsules separated from each other. This allows, for instance, to place a set of 2 capsules inside the dish, and another set of 2 capsules a bit outside the dish. The idea here is to enable the separation of a flying (migrating) bird above the dish, with a local bird calling from the side (note that this could also be done with a 2×1 setup). This could be of matter for species rarely calling in the middle of the night, and where it remains unsure if it concerns a local bird or an actively migrating bird (ex. Blackcap, Common chiffchaff). When migrating and calling above the dish, both channels should display a similar amplification. For a local bird calling from the side, or even better at a lower position when you place your dish at a higher location (ex. roof), calls on the channel outside the dish should be more amplified than those inside the dish. Alternatively, you can also place the 2×2 microphones all outside or inside the dish, it increases a bit the recording power, but probably also increases a bit the amount of background noise.
To build such a setup, you should solder a “bridge” between two capsules on the same channel (left or right), using again a piece of audio jack and the same soldering process as before by respecting the colour poles (+/-). Such a bridge is displayed on Figure 5.

C. Costs for the DIY parabolic microphone
- Parabolic dish: 40 EUR (incl. shipping)
- Capsule microphones (4x AOM-5024): 31 EUR (incl. 20 EUR FedEx shipping)[1]
- Handle and microphone holder (incl. screws, chair handle): 15 EUR
- Wind shield: 10 EUR (incl. shipping)
- Audio jack: 1 EUR (incl. shipping)
- Shipping: 8 EUR (when 1, 2, 4 and 5 are ordered together on amazon)
TOTAL: 100 EUR
Extra: solder kit (20 EUR)
D. Comparative tests
I compared my DIY parabolic dish with the Hi-Sound Mono dish (with 4 capsules) from Dodotronic (600 EUR inc. VAT and shipping) by recording three nights in October 2021. In a nutshell: results are very similar. Overall, both dishes have a comparable detectability (sometimes one dish captured better a far-calling bird than the other, probably depending from where the migrating bird was calling and/or the dish position). Four capsules increased a little bit the recording “power” compared with 2 capsules, but not significantly (so working with two capsules is perfect too). I had no local birds calling during the night, so this theory could not be tested. Here below some illustrations from the different recordings. Fig.6 illustrates birds at close range, and both dishes give comparable results. Fig. 7 and 8 show that some calls are more amplified on one or the other dish, probably depending on the angle from wish the bird called.
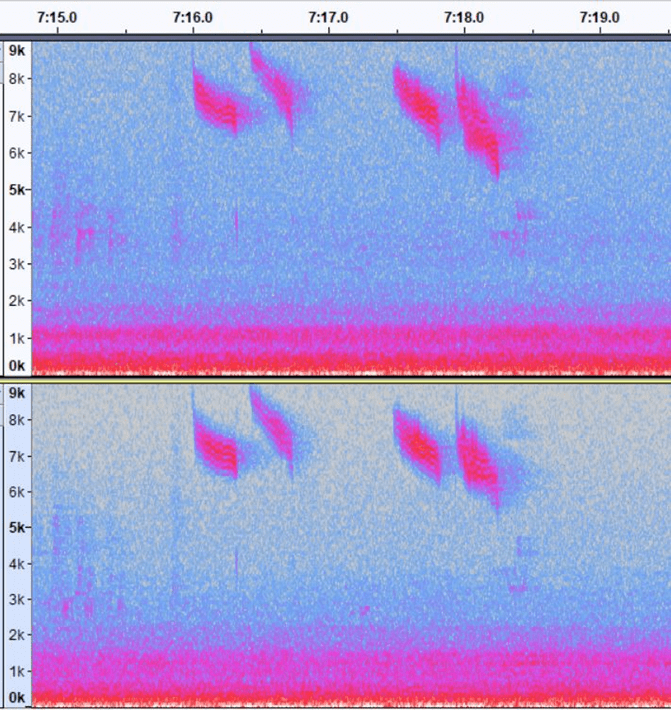
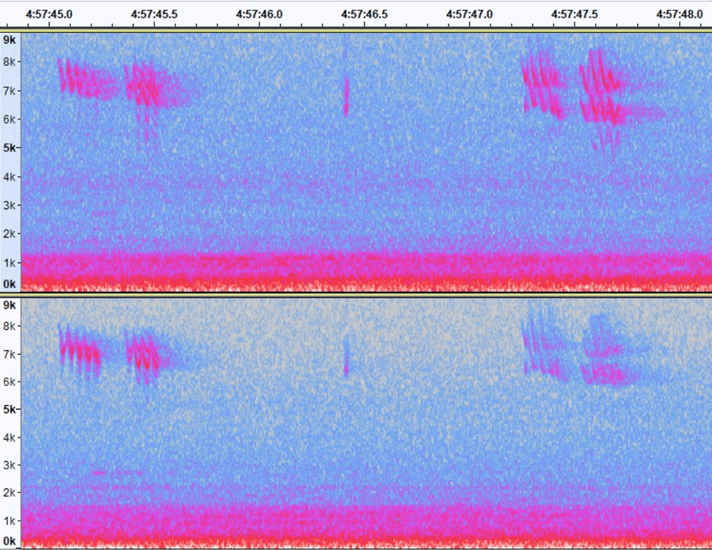
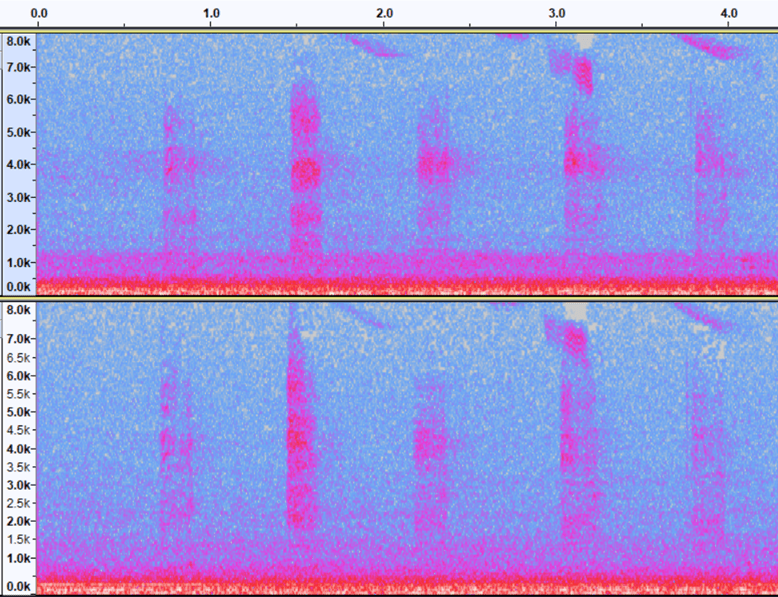
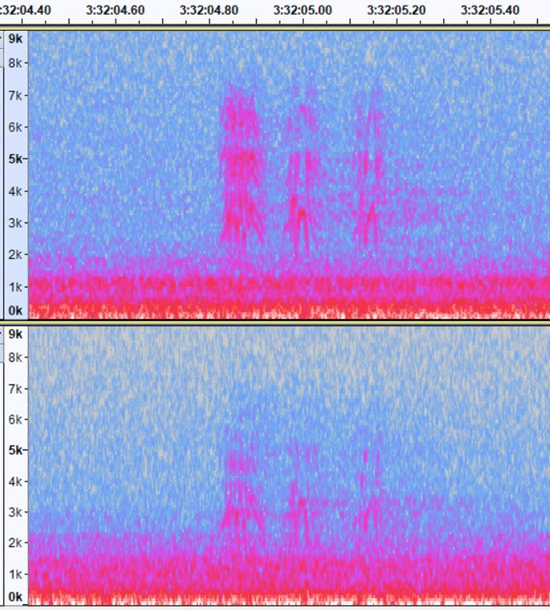
Fig. 9 illustrates a bird calling at mid-range, where it got more amplified on the Dodotronic compared to the DIY dish. Such cases occurred interchangeably between both dishes, merely depending on the position of the dish and/or angle of calling. Main result is that in almost all such cases, the species could always be identified on both dishes. So only the amplification of the recording varied depending on position, not on the material itself.
E. Stereo parabolic microphone with 2×1 capsules
The interest of separating the microphones physically from one another (with a shield between both capsules) lies in fact that one channel might amplify more than the other, thereby giving some information on the flight direction. This only works in rarer cases but might still be interesting in certain studies.
Again, with the idea to build such a system in the cheapest way, I recycled some materials I found at home: an old TV socket and the case of a very bad Christmas CD that I wanted to throw anyway 😉. I used part of the plastic CD cover as shield to separate both capsules, and the TV socket to hold the capsules. Again you can slice the microphones outside or inside the dish, and the capsules point well in the middle of the dish. Of course, many other inspirational ideas can reach (or improve) this setup, just try it! Here below some pictures.
E. Conclusions
Although the dish diameter being a bit smaller, the DIY dish showed comparative results to the Dodotronic dish. The advantages being the lower price, the compactness (for transport for instance) and the flexibility in mount type (straight or bended siphon, microphones inside or outside the dish). Given the lower price, you might also risk to leave your DIY dish for a longer period outside (indeed with a good weatherproof protection of the capsules) or in an interesting habitat. The disadvantage is that it does not look very professional (with a siphon and a sink strainer…) and is possibly a little less robust as the Dodotronic version (with more metallic parts).
[1] The best is to buy 25 capsules, then you are just above 50 EUR and there are no shipping costs (so you are at around 2 EUR/capsule). You can for instance use the other capsules to record birds during the day in interesting habitats 😉

It’s interesting that no real assessment of the focalpoint of the parabola has been conducted (or perhaps it has but not mentioned. I would expect this to have a fairly significant bearing on the amplification and quality of the recording. It is possible that the focus is just right “naturally” by virtue of the its default shape?
LikeLike
Dear Paul, thanks for your comment! There were some tests (inside a quiet room) on the focal point position, it seems this focal point is located about 1/4 inside the dish (compared to the dish opening surface). You can easily test this position after your setup is ready. The gain in amplification is not very high compared to a deeper position in the dish, or the microphones located a bit outside the dish. The reason is probably because the capsule are so sensitive already. What should be further tested, is (given the environment in which you record, i.e. open or semi-open habitat) the position in wish you capture more birds (this is not per se at the focal point, as the capsules being inside the dish you could, for instance, miss birds calling from the side). This DIY dish allows to slice the capsules where you want, and to test for yourself what is the best position of the capsules you need. Kind regards, Franck
LikeLike